Spoken source material
How to turn audio recordings, podcasts and voice notes into a book
To turn recordings into a book, select the strongest audio, transcribe it, identify recurring themes, build a chapter plan, draft from the source material, check attribution and quotations, then edit the manuscript as a book rather than a transcript.
Published · Updated
Quick facts
- What it is
- A step-by-step walkthrough of taking podcasts, talks, lectures, sermons or interviews into a book manuscript.
- Best for
- Authors sitting on hours of recordings who want to see, screen by screen, what the process actually involves.
- What it does
- Walks through uploading recordings, reviewing what is in them, finding the shape of the book across them, and drafting material that still sounds like you.
- What it does not do
- It does not turn an archive into a finished book without your judgement about what belongs in it.
Related Your Book Pro page: Dictating your book
If you have recorded podcasts, talks, lectures, sermons or interviews, you already have hours of considered material in your own voice. This guide walks through exactly how Your Book Pro turns those recordings into usable book material, screen by screen, and where you stay in control of every decision.
Nothing in this workflow rewrites your manuscript or your plan behind your back. Recordings become sources; sources produce suggestions; you decide what, if anything, becomes part of the book.

Before you start↑
Work inside an existing book. The recordings workflow always attaches to one of your books, so your genre, plan and manuscript stay exactly as they are. If you do not have a book yet, create one first, then come back to the Create tab.
Create gives you several ways to add material - Dictate (speaking, roughly three times faster than typing), Write (typing straight into the raw material box), Upload (audio, an existing manuscript, background research or a Scrivener project), and Import a podcast RSS feed. This guide covers the audio workflow. You can mix them freely: uploaded recordings, dictated sessions, typed passages and research documents all feed the same book, and the planning and writing tools in Shape treat them identically.
- Have your audio files on the device you are using, in a common format such as MP3, M4A, WAV or WebM.
- Know roughly how long each recording is - allowances are measured in minutes of audio.
- If other people speak on the recordings, be ready to say who they are before any direct quotation is used.
How many recordings should you upload?↑
Start with fewer than you think. A book is not a back catalogue, and uploading two hundred episodes buries your themes rather than revealing them. Most podcast books are hiding in ten to fifteen episodes: the ones listeners still email you about, the ones you keep referring back to, and any where you explained your central idea properly rather than in passing.
The wizard tells you what the material does not yet cover, so it is easy to come back and add more. It cannot tell you what to ignore.
Podcasters can bring episodes in from an RSS feed instead of uploading files. See Your Book Pro for podcasters →
Steps 1-3: upload your recordings↑
The recordings workflow is a seven-step wizard. Every step saves as you go, and Back always returns you to what you had already chosen or typed on the earlier step. If you decide against it, Cancel leaves the wizard, clears the run and puts you back on the Create tab.
- Step 1 - Upload recordings. Open the book, go to the Create tab and select Upload, then choose Audio recordings from the upload chooser. Pick audio files with Choose audio files or drag them onto the card. Each file shows its name, duration, size and a live status badge, and a summary line shows how much of your allowance is left. Long files are compressed in your browser first, with a progress bar, so large recordings still upload.
- Step 2 - About your recordings. A short note about what you uploaded (a podcast series, a set of talks, an interview). It shapes this workflow only; it never changes your book's genre or plan.
- Step 3 - Review voices. "Who spoke on each recording?" There is no automatic speaker detection, so you name the speakers and add any contributors. When transcription and preparation have finished, the step waits for you: press Continue yourself when you are happy, rather than being pushed on automatically.
Upload recordings
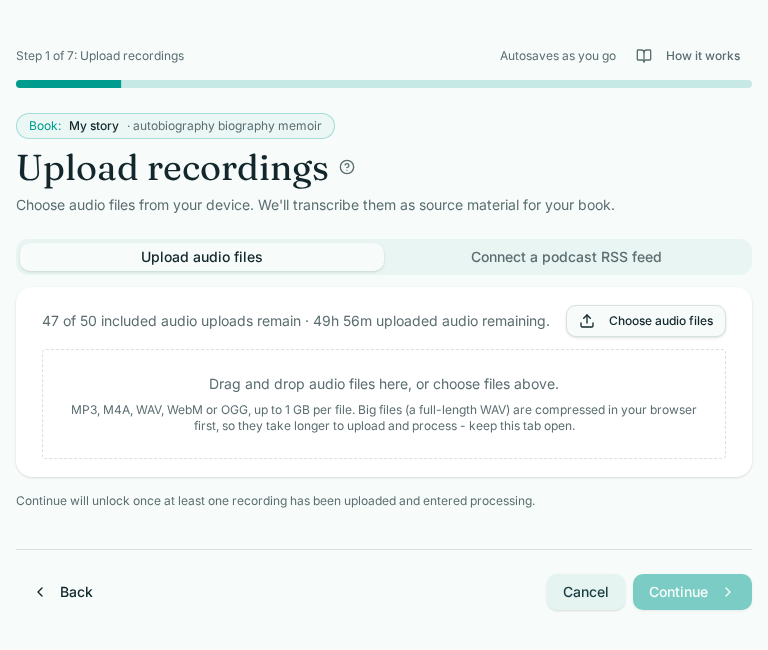
Step 1: each file shows name, duration, size and a live status badge, with your remaining allowance underneath.
What to look for
- Audio recordings / An existing manuscript
- Choose audio files, or drag them here
- episode-04.mp3 · 48 min · 44 MB · Ready
- You have used 62 of 180 uploaded minutes
On screen: The wizard footer shows Back, Cancel and Continue on every step. There is no "Continue later" - Cancel clears the run and returns you to the Create tab.
If a selection would exceed your allowance, an amber warning explains whether the problem is total minutes or the number of files and asks you to remove some before continuing. Pro accounts also see a Buy More Storage option at that point. While uploading is in progress, the Create tab's button reads Uploading, and selecting it drops you back into the wizard at the step you had reached.
Review voices
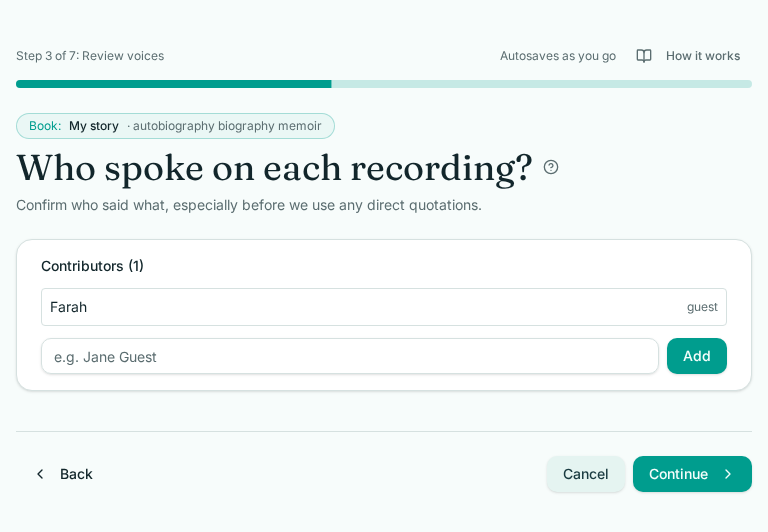
Step 3: transcription finishes, then waits. Nothing advances until you press Continue yourself.
What to look for
- Who spoke on each recording?
- episode-04.mp3 - speaker: (add a name)
- Transcription complete · 7,412 words
On screen: check the word count under each file to confirm the transcript arrived, then add a name beside every speaker. The Continue button stays put until you press it, so take your time here.
Step 4a: extract the meaning - key messages↑
Our example: an interview show about second careers, twelve episodes selected from four years. Step 4a returns forty-one items - arguments made, stories told, quotations worth keeping. We keep eleven.
This step starts working as soon as it opens. Your Book Pro reads your transcripts and pulls out what the recordings actually contain, as a scannable list you can work through: what was discussed, your main points and arguments, the stories and examples you told, memorable quotations, the conclusions you reached, and the questions you left open.
- Roughly one item per two minutes of audio is the ceiling, not a target - most authors end up keeping between five and fifteen.
- Use the pencil to reword an item, the bin to remove it, and the tick box to keep the ones worth carrying forward.
- Every item shows the recording and timestamp it came from, and quotations are kept word for word - nothing is invented.
Step 4b: extract the meaning - main concepts↑
From those eleven, the concepts come back as three genuinely different books. We keep two, and "starting again after forty" becomes the primary.
Key messages describe what your recordings contain. Concepts are the books Your Book Pro can see inside them. This step reads your kept key messages alongside your genre, quiz answers and existing Plan (Shape → Plan), and proposes the genuinely distinct directions the material supports - up to ten, but only as many as the recordings justify. If the result is not right, Try again produces a fresh set.
- Tick every concept you want to keep, not just one. The first one you select becomes the primary concept for the book.
- Each concept shows its promise and who it is for, so you are choosing a direction rather than a title.
- If you go back and change your key messages, this step tells you the concepts are out of date and offers to refresh them.
- Your choices persist. They are marked Chosen when you look at that source's themes later on the Manage sources card, and a Send to Plan button there appends them to your plan in Shape → Plan for review.
Extract the meaning: Main concepts
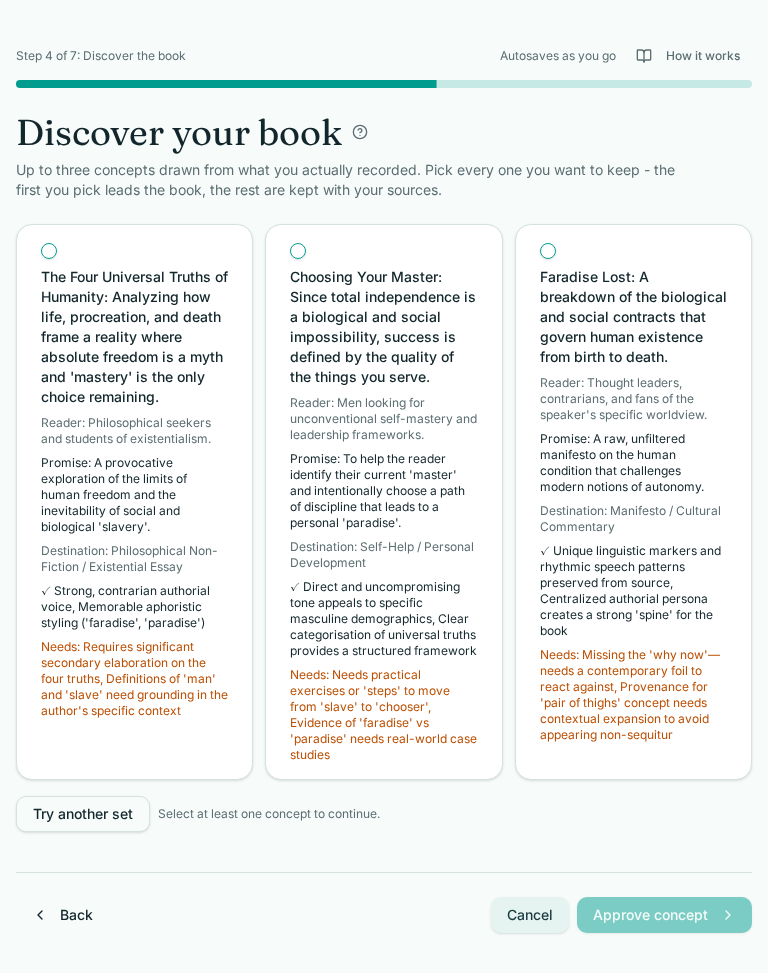
Step 4b: concepts generate as the page opens, built from your kept key messages. Tick as many as you want - the first becomes the primary concept.
What to look for
- Reading your transcripts… about 40 seconds left
- ☑ Theme: starting again after forty
- ☑ Theme: the cost of saying yes
- ☐ Theme: building a small audience
On screen: Selections you make here reappear later as Chosen badges on the Manage sources card, next to a Send to Plan button.
Step 5: shape the chapter spine↑
The spine proposes nine chapters. Three episodes from different years collapse into one chapter about the decision itself. The missing line reads: no closing argument - which is fair, because the show never had to end.
Like step 4, the chapter spine generates automatically when the step loads. You get a proposed running order, with each chapter's job in the book described in a line or two, and a note of what is still missing from your recordings.
- Use the pencil on any chapter card to rename it or reword what that chapter does.
- Use delete to drop a proposed chapter you do not want.
- Try again asks for a different spine; your edits are remembered if you step backwards and forwards through the wizard.
When you approve the spine, those chapters are created in your book as planned chapters, carrying the chapter's purpose and the approved concept as planning notes. That is why, straight afterwards, the chapter dropdown in the Shape tab lists your whole spine and not just the one chapter you had written.
Shape the book
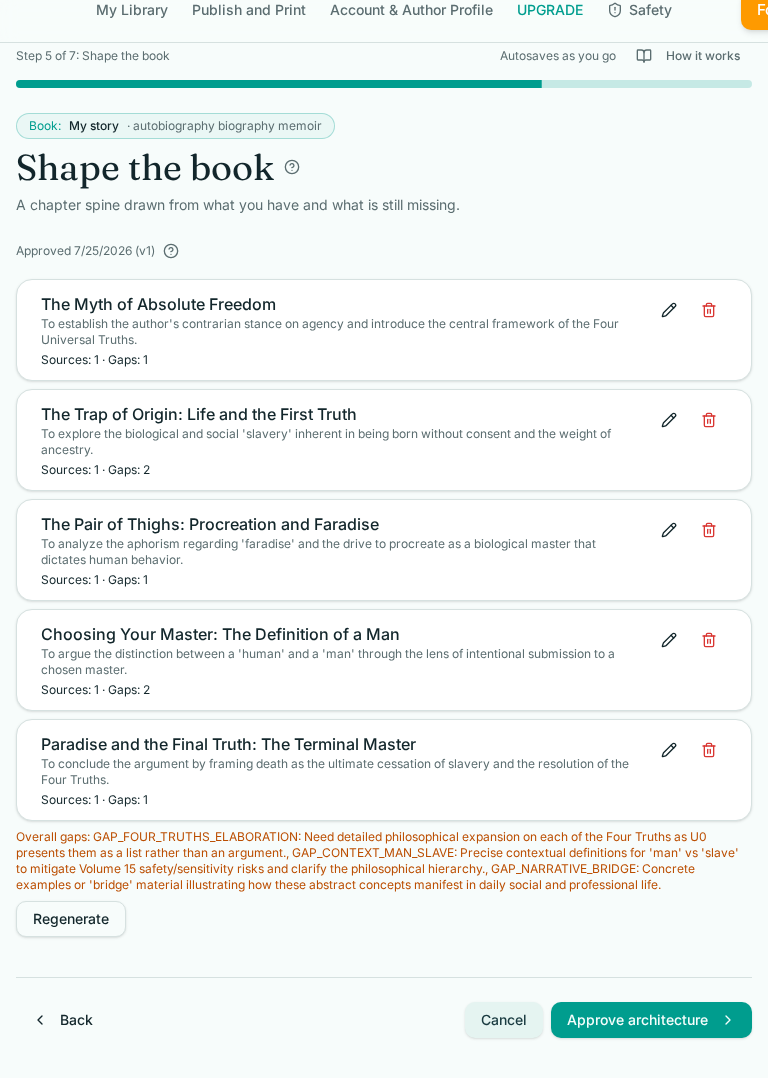
Step 5: a proposed running order you can rename, reword, reorder or delete before approving.
What to look for
- 1. Why I stopped - sets up the turning point
- 2. The quiet year - evidence and consequence
- 3. Beginning again - the practical method
- Still missing from your recordings: a closing argument
On screen: hover a chapter card for the pencil (rename and reword its function) and the bin (remove it). Drag the cards to reorder. The "still missing" line tells you what your recordings have not yet covered, and nothing is saved to your book until you press Approve.
Step 6: writing breadcrumbs↑
The guest interviews go in verbatim. The solo episodes are drafted. Two concepts stay in Plan for a later book.
Your Book Pro does not write chapters for you. This step turns the recordings behind each chapter into writing breadcrumbs - planning bullets that go into your Plan notes so you have the evidence and the direction in front of you while you write.
- Choose a chapter. Each chapter only ever uses the recordings you allocated to it when you approved the shape of your book. Chapters with nothing behind them are marked needs your material.
- Prepare breadcrumbs. You get points, stories, checked quotations, open questions and gaps, each showing which recording it came from. Edit any of them, tick the ones worth keeping, then press Add to Plan. They are saved under "Writing breadcrumbs for this chapter" in your Plan notes - never exported, never counted as manuscript words. Refresh or Start again for this chapter gives you a fresh pass.
- Add my words exactly as spoken. If you want the transcript itself on the page, pick a recording (or all of them), name the new chapter and press Add transcript exactly as spoken. Nothing is rewritten or tidied, and the record of which recording those words came from travels with them.
- Do nothing yet. Leaving the step alone leaves your manuscript untouched. Your recordings stay attached and available in Shape → Plan and Shape → Sources (Manage sources).
If you used an earlier version of the wizard, any chapters it drafted for you are kept under Earlier drafts we made for you as history only, so nothing is lost.
Writing breadcrumbs
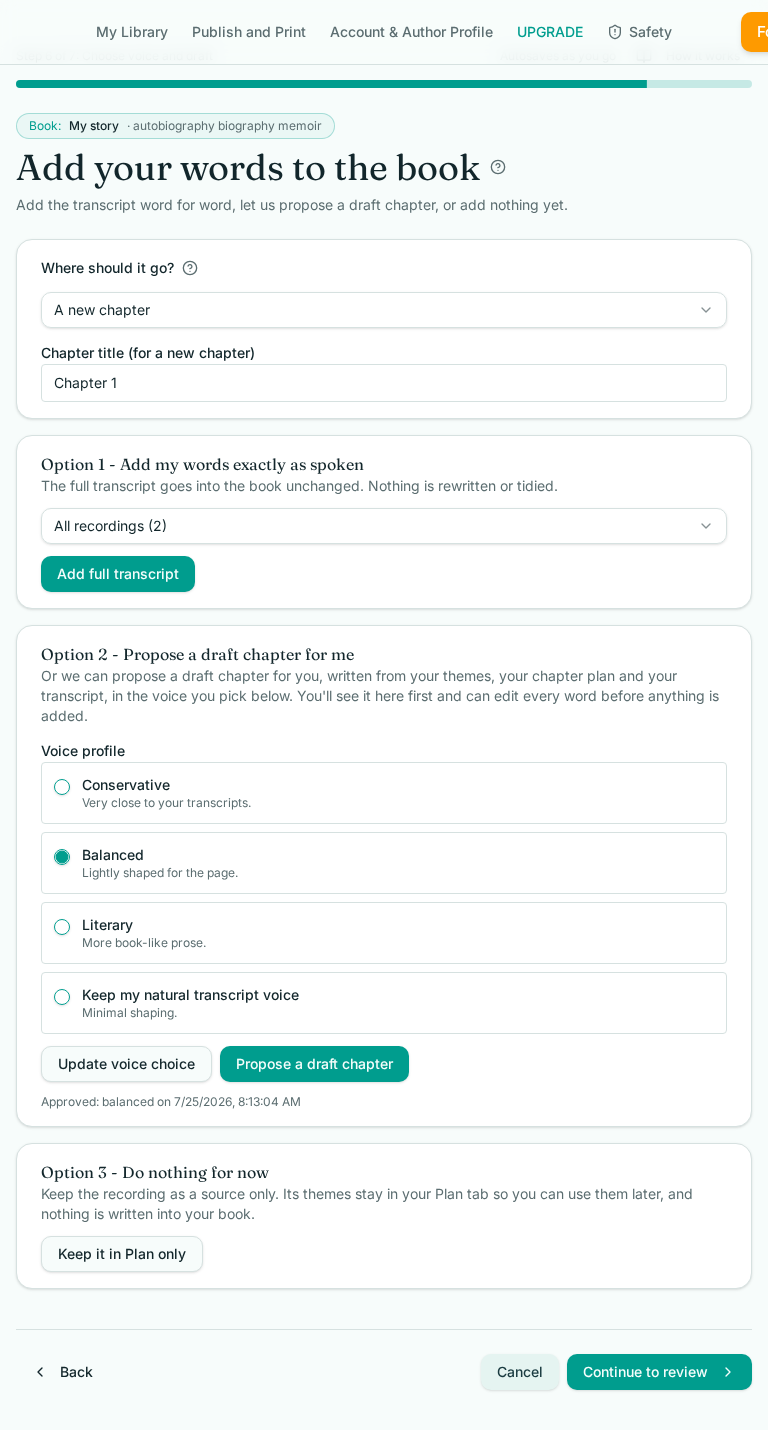
Step 6: planning bullets built from the recordings behind each chapter. They go into your Plan notes, never into your manuscript.
What to look for
- Which chapter? 3. Beginning again (7 clips)
- Point: the decision was made before the money ran out
- Quotation (checked): “I stopped asking permission.”
- Gap: no recording covers what happened next
On screen: pick the chapter first, then Prepare breadcrumbs. Tick the bullets you want and Add to Plan. The only thing that reaches your manuscript here is a transcript you add word for word.
Step 7: final source check↑
The final step is a plain-English source check, with a What is this page? tooltip at the top explaining what it is checking: recordings and transcripts saved, original recordings preserved, contributor permissions, safety and rights, the approved concept and chapter plan, source traceability and your pilot chapter.
Anything marked Action needed is clickable. Selecting it opens a short explanation and a button that takes you straight to the step that fixes it - recordings, voices, concept, spine or breadcrumbs - rather than leaving you to guess. Nothing flagged is ever silently removed or rewritten; you decide how to resolve each item. When the list is clear you can go to Review my book plan, Start drafting (under Shape → Edit) or Manage my sources (under Shape → Sources).
Your recordings are ready
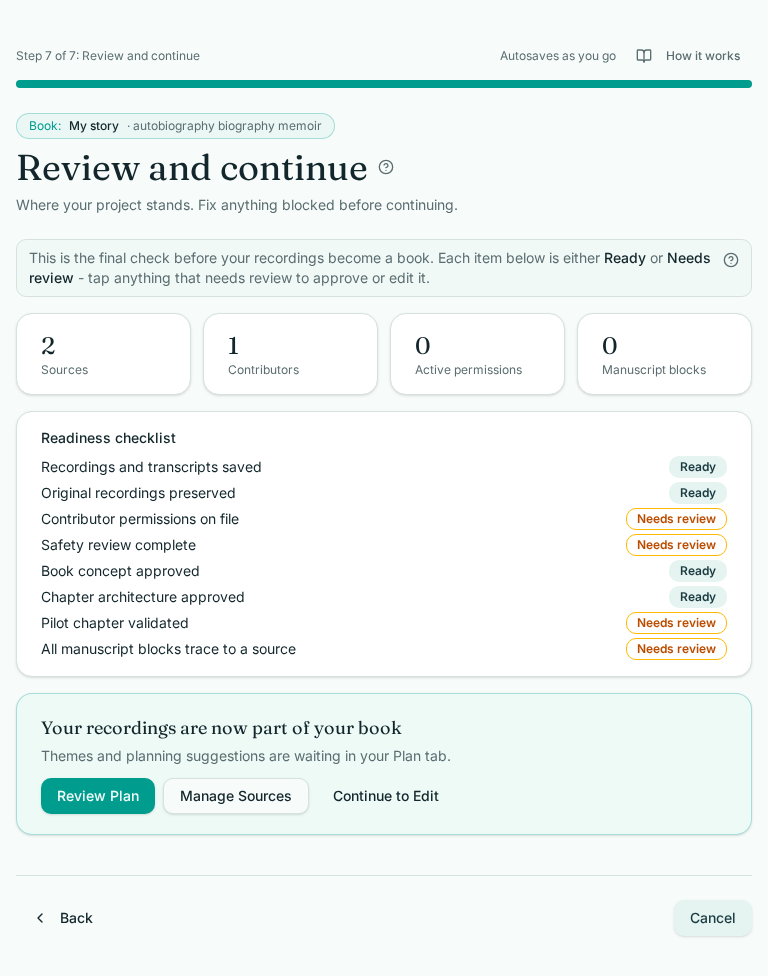
Step 7: every Action needed badge is clickable and jumps to the step that fixes it.
What to look for
- Recordings and transcripts saved · Ready
- Contributor permissions recorded · Action needed
- Chapter plan approved · Ready
- Source traceability · Ready
On screen: scan the badges down the right-hand side. Green Ready needs nothing; amber Action needed is a button - tap it to see what is missing and jump to the step that fixes it. Only then use Start drafting, which takes you to Shape → Edit.
Where your recordings live afterwards↑
Your recordings remain available in Shape → Sources, on the Manage sources card. Pick one recording, or All sources, and you can:
- View transcript - read the source as transcribed. The transcript is never rewritten in place.
- View themes & book ideas - the themes found in that source, with the ones you chose at step 4 badged as Chosen, and a Send to Plan button to push them into Shape → Plan.
- Use in my book - returns to step 6 so you can add planning ideas to your Plan, or add the transcript words exactly as spoken.
- Add a note, pin or attach to a chapter, or send to Plan (Shape → Plan) as reference material.
For a fuller audit, Manage all opens a dedicated page listing every source line by line: file name, type, date uploaded, word count, minutes used, speakers and status. From there you can edit a transcript, rename a file, change its type, rename the people involved, or delete a source outright.
The source you select on the card is also the one Ask Your Book Pro uses when you choose "Current source".
Sources also holds material that has nothing to do with this wizard - imported manuscripts, Scrivener projects and Background research. For the full explanation of the Sources tab, see A Beginner's Guide to Your Book Pro.
Review planning suggestions from these recordings↑
After the wizard, the themes drawn out of the recordings you just uploaded appear in Shape → Plan in a card titled Planning suggestions from your sources, with the reminder that nothing is added to your plan until you choose. Each suggestion shows Your plan now beside Proposed, plus which recordings it came from. Four actions are available per suggestion:
- Add - append the proposed text to that plan section.
- Merge - combine the proposal with what you have already written.
- Replace - overwrite the section. You are asked to confirm first, because your previous wording is not kept.
- Dismiss - remove that suggestion from the list.
Accept all safe additions applies only the suggestions that do not overwrite anything you wrote, and reports anything it skipped. If you edited a plan section after the suggestions were prepared, you get a "Your plan has changed" prompt rather than a silent overwrite. Your manual plan writing is protected throughout.
Draft more prose from these recordings↑
Outside the wizard, Ask Your Book Pro at the top of the Shape tab can keep drafting from the recordings you have just uploaded. There is no outcome dropdown to set - just ask for what you want and it works out whether you need manuscript text, a plan note or an answer.
- Set the scope to Current source (the one picked in Manage sources), Choose sources to tick several, or All sources.
- Write your request - for example, "Summarise the central ideas from this recording in my authorial voice."
- Review the draft. It is labelled Draft - nothing has been added yet, with a word count, the voice used, and a From your sources panel listing the passages behind it and why each was used.
- Edit the generated title and text directly before doing anything else.
- Choose Add as a new chapter or append to an existing chapter from the dropdown - including the planned chapters created from your approved spine.
- Select Review and add and confirm. A version of your manuscript is saved first, so the insertion can be undone.
What stays under your control↑
- Transcripts are never rewritten in place; only approved name spellings are corrected.
- Steps 4 and 5 propose; you select, edit, delete or ask again before anything is approved.
- Step 6 writes nothing into your manuscript unless you add a transcript word for word - breadcrumbs only ever reach your Plan notes.
- Overwrites are always confirmed, and your manuscript is versioned before insertion.
- Approved material keeps its provenance, so you can trace a passage back to the recording it came from.
Upload allowances↑
- Plus: 15 minutes of uploaded audio in total.
- Pro: 10 files and 600 minutes in total, up to one hour per file.
- Dictation: audio recorded in the site recorder does not count against uploaded audio allowance.
Promotional offers can raise these limits. Podcasters who upload an episode or import a feed receive ten bonus episode uploads on top of the ten included with Pro, lifting both the file count and the total hours. Your current remaining allowance is always shown on the upload screen itself.
Frequently asked questions↑
- I have hundreds of episodes. Where do I start?
- With ten to fifteen of them. The wizard finds themes by looking across recordings, so a focused selection produces a clearer chapter plan than a full archive does. Choose the episodes where you explained your central idea properly, plus any your listeners still bring up. Step 5 tells you what the material has not covered, so you can add more recordings afterwards and rerun the spine. Nothing is lost by starting small.
- My guests are on these recordings. Can I publish what they said?
- Step 3 asks you to name every speaker and add contributors, because there is no automatic speaker detection. You then confirm what has been agreed for the people listed - permission covering direct quotation, paraphrase, combining sources and export - and that permission travels with each contributor through the workflow. The readiness check at step 7 flags anything unresolved before you go further, and you can rename or reassign speakers later without re-transcribing. Your Book Pro does not give legal advice and clearing permission with your guests remains your responsibility. What it does is make it difficult to quote somebody by accident.
- What audio files can I upload, and how long can they be?
- Common recording formats work, including MP3, M4A, WAV, AAC, OGG and WebM, so exports from most podcast hosts, phones and voice recorders can be used directly. Large files are compressed in your browser before they upload. Each plan has an allowance for total uploaded minutes, and Pro also has a per-file length limit. Your remaining allowance is shown on the upload screen before you commit a file, and audio you record in the site recorder does not count towards the uploaded audio allowance. Plus is pay as you go, so you can top up credits for extra transcription only when you need them - see the Plus page for current prices.
- Can Your Book Pro tell who is speaking on an interview recording?
- Not automatically. There is no automatic speaker detection, so step 3 of the wizard asks you to confirm who spoke on each recording and add contributors such as a host or a guest. You label attribution yourself, and you can rename or reassign speakers later from the Manage sources card in Shape → Sources without re-transcribing the audio. This matters most before any direct quotation is used, because permission to quote, paraphrase, combine sources or export travels with each contributor.
- Are the names in my book spelled correctly in the transcript?
- Yes. Every transcription, whether you dictate it or upload it as a source file, is checked against your book's own dictionary of approved names, places and invented terms. Known names are corrected to the spelling you approved, without any of your wording being rewritten. You can add or correct entries at any time and later transcriptions will follow them.
- How do I get chapter suggestions from my recordings?
- Steps 4 and 5 of the wizard do this automatically. As soon as step 4 loads, Your Book Pro reads your transcripts and proposes themes and book concepts; as soon as step 5 loads, it proposes a chapter spine. You can edit or delete any proposed chapter with the pencil icon, or ask for a fresh attempt. When you approve the spine, those chapters are created in your book as planned chapters so they appear in the Shape tab chapter list. Nothing is added to your manuscript text until you choose to add it.
Start with what you have already said↑
The hardest part of a book is usually finding the material. If you have been speaking about your subject for years, that part may already be done. This workflow simply gives it structure, and leaves the judgement with you.